Pages

Thursday, 13 March 2014

Spring activities

Last weekend we went out flying. Yes, flying with a quadcopter, a model aircraft Peter bought for work. The quadcopter is equipped with a camera and is going to be employed to fly over fields to give an overview of crops. First we spent the morning at home searching the net for instructions, and thanks to Youtube we found really good videos how to get the software working and the aircraft started. Then we drove outside town to a field far away from buildings.
Our first flight was a bit of an adventure as you cannot see the little white quadcopter well against the bright sky when reaching 50 meters of hight. I'm also not used to estimate distances of flying objects, our little fellow always seemed to be too far away from us. The camera which is mounted underneath the body of the quadcopter was connected to our tablet. We could see the hight, distance and battery status and of course the field it was flying over. We trained starts and (soft) landings and how to use all the control instruments. It was such fun, and I'm sure the people who are going to work with the quadcopter will love it too.
Coming back home I admired our spring basket with the pink hyacinth. It grew every day a few centimeters and got heavier too with all flowers opening almost at once. I tied it to the basket handle as the flowers touched the wall already.
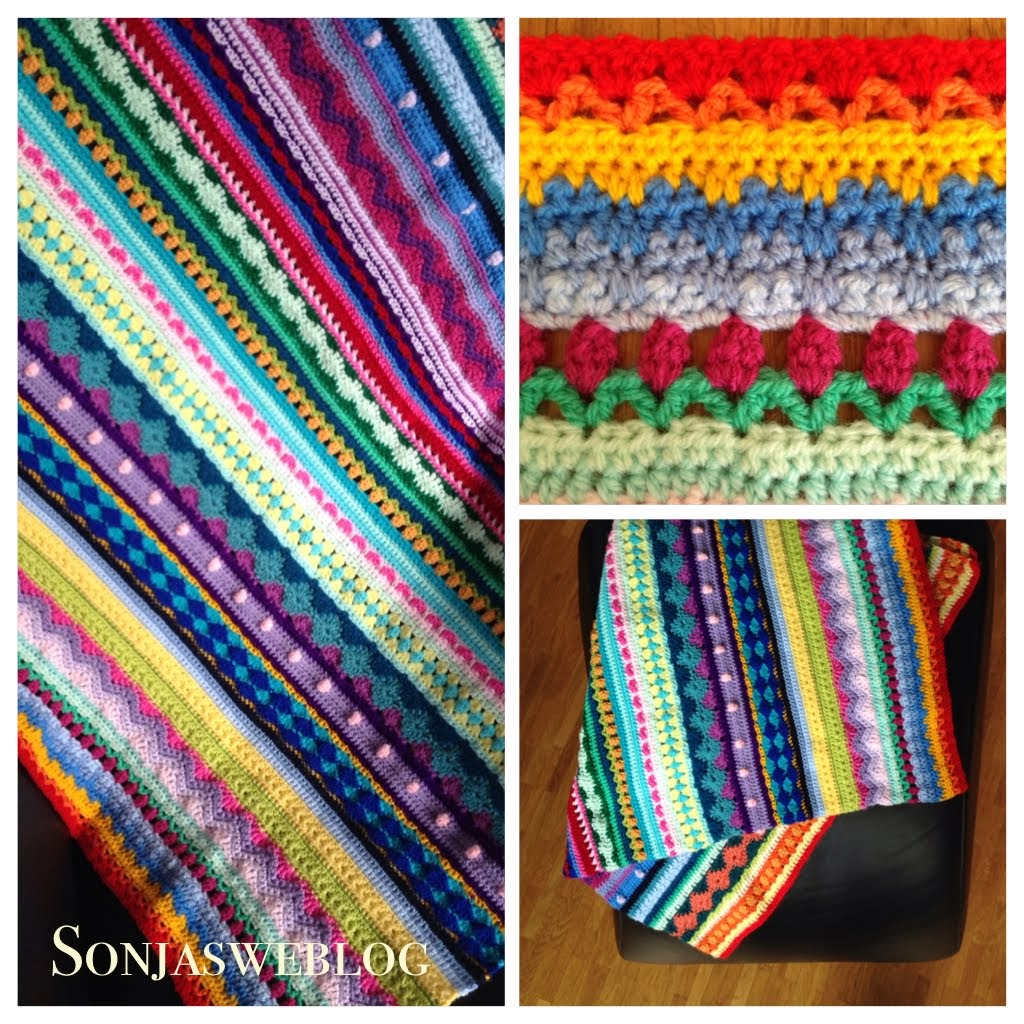
My mixed stripy blanket is growing too. I tried to balance the colours as I found the combinations so far a bit too much. Via ravelry I found out about random stripes and colour generators like this one here and even one for squares here. Amazing what is out there in the net! I have not used the generators though, but bookmarked them for future use.
I visited a tea house the other day with my lovely friend U. It is a small shop where they sell tea and cakes. In a little room at the back of the shop you can also drink tea and eat yummy curries. It's been a long time since I sat in a tea house (in Frankfurt there used to be one a few years ago). In our region I didn't know any, and I was very surprised and pleased to find out about that place. Have to go there more often!

Thursday, 6 March 2014

Planting progress

Remember the tiny diy greenhouse? First leafy greens are visible!
As I planted three different types of herbs I wonder if this little green somethings are really two different types as they all look the same. Concerning number three, the perilla, I'm afraid they will not sprout (right side with yellow markers). We will see...
Planted some daffodil bulbs in our "spring basket" two weeks ago. (I bought the bulbs with green leaves and planted them into the basket).
Unfortunately they all withered already. So I replaced the daffodils with a hyacinth, "Kalanchoe blossfeldiana" and mini Chrysanthemums. Hope they will survive a bit longer.

Monday, 3 March 2014

Mixed pattern, stripy blanket

I started to crochet a new blanket a few weeks ago. My second blanket in fact. It's a fun project to play with lots of colour combinations and to learn new patterns! Actually I first planned to follow just one blanket crochet along. Then I figured it would be a good opportunity to try out more patterns. The blanket is going to be large enough to have a variety of patterns. And the list of websites I'm gathering patterns from is growing:

1. Hannah's from "Not your average crochet" (Pdf-document, easy to follow!)
2. Jules' from "Little woolie" and
3. Carina's + Jessica's from "Schoenstricken.de" (Very instructional pictures, written in German)
4. Ana Contreras' from "Lanas de Ana"
5. I'm going to try some hearts-in-a-row from here "Annie's crochet world"

Here is the beginning, the first 18 rows: Besides single crochet, half double crochet and double crochet, I used the Granny Stripe, Catherine Wheel and Star Stitch.
 
Followed by Bobbles and Chevron-Ripples:

Then Waves and Tulips:

Here are outlined clusters (actually trying to make it look like hearts, but I will try another pattern for that), Granny Stripes and Catherine Wheel again.

Followed by another row of Bobbles, Shell Stitch and Star Stitch:

This is what it looks like so far:
Yes, very colourful, very stripy, jumping right into your eyes! When planning this blanket it was cold and grey outside and I felt a need for cheery colours. Hope I will like them in summer as well.

Saturday, 22 February 2014

Making scratchy yarn soft

Last year I crocheted the Japanese flower scarf inspired by Lucy's blogpost. I ordered my first ever Japanese crochet book from Japan in Japanese and surprised myself in being able to follow the stitch pattern. It was quick and easy going and such a joy. I used the beautiful yarn Lucy recommended: Debbie Bliss Andes, which consists of 65% baby Alpaca and 35% mulberry silk. Very soft and fluffy yarn. What I least expected of this yarn was that it was scratchy to my skin. What a disappointment! Still I loved the scarf very much and only used it when wearing a polo-neck jumper. Then I came across Kat's blogpost about how to make yarn less scratchy. It sounded quite simple and worth a try. You just need a teaspoon of lanolin, a teaspoon of dish detergent and some hot water. Stir lanolin with dish detergent in a container with hot water until lanolin has dissolved, let the soapy water cool down a bit and add your wooly item. Fill in some more water until wooly item is covered and let soak for a few hours. I let my scarf soak for six hours and rolled it into a big towl to drain. (No rinse with clear water) Then I let the scarf dry flatly on a towel.
And miraculously the scarf was less scratchy afterwards! In the tutorial it is recommended to repeat this treatment until the wooly item is soft enough. Well, for me it was already an improvement even though it is still a tiny bit scratchy.

Thursday, 20 February 2014

Tiny indoor greenhouse - diy

As spring seems to be beginning soon I thought it would be a good time to plant herbs. I love fresh herbs in my cooking, it gives meals a special flavour, fresh and full of taste. So I usually have frozen herbs in the freezer and a pot of basil on our kitchen window sill. Most herb plants in a pot I bought in the supermarket though don't survive, so the idea of cultivating herbs myself came into my mind. There is also a plant which is used in Korean dishes, called perilla leafs (sesame leafs), that I really love but cannot buy freshly here. I would love to grow this plant myself and got some perilla seeds to try it out. As I have no experience as a gardener I was not sure which way would be best to start growing plants from seeds. So I surfed the net and found an easy and simple idea to build a tiny indoor greenhouse here.
All you need are eggshells, an egg container, some soil and a plastic bag. Well, why not trying it out?
Just fill the eggshells with a little soil and scatter the seeds on top, fill it up with a little more soil and pour some water. Additionally to the perilla seeds I did some eggshells with oregano and thyme seeds. Those herb seeds are sooooo tiny it was impossible to scatter them evenly. If they would all germinate it will get very crowded in the eggshell.
Then place the filled eggshell into the egg container and cover it with a plastic bag with some holes for air. I placed my mini greenhouse on the window sill and hope that I will see plants growing.
When they have developped leaves and roots they can be repotted into a bigger container, the eggshell can be broken softly without damaging the delicate roots. Well, this is theory right now.
I tried to grow perilla last year in a little glass jar with kitchen tissue as underground. They germinated and developped tiny leaves and roots but when repotting them into soil I damaged the roots that got stuck in the kitchen tissue. I planted them with kitchen tissue still on the roots into soil but the tissue would never dissolve and the roots did not grow further. So that was the first planting experience disaster. Hope this one will work out better!

Friday, 14 February 2014

Happy Valentine's Day

This our chocolaty chocolate cake with red sugar hearts we had for breakfast this morning. Well, not the whole cake but the slice that is missing in the picture. It's a very soft and moist chocolate cake that we love a lot. So today was the right occasion. I will share the recipe in a later post.
And a bunch of red tulips to make it a perfect Valentine's breakfast. Happy Valentine's Day for you too!

Thursday, 13 February 2014

Two little owls and the beginning of a new blanket

The companion for the first owl is finished! I blogged about the first one here. Now there are two happy fellows who already found a new home. A friend of mine who came over to our place loved them so much I gave them to her.
So there is room for more amigurumi projects :-)
 
But first I am working on a new blanket project. It is a mixed pattern, stripy blanket. There are great tutorials out in the net and I am following the ones from the talented crocheters HannahJules and Carina and Jessica. And my first few rows are looking like this:
I am using my stash of Schachenmayr Original Bravo that I blogged about earlier. I love working with this acrylic yarn as it is easy to crochet with, stitches are clearly defined, it is soft and machine washable. I chained 241 stitches using a 4 mm hook and doing the rows back and forth. Having so many colours to choose from I hope they will go together nicely.