Pages

Showing posts with label crochet. Show all posts

Saturday, 19 April 2014

Of birds and eggs

The last weekends I was busy crocheting some Easter decoration: some little birds and some eggs.
And interestingly they are almost the same size. The birds are filled half with filling material and half with rice to give it better stability. Instead of safety eyes I used the ones to glue on, but that's not safe for little kids or pets as the eyes tend to fall off when touching.
The pattern for the little birdies including a little story can be found here.
For the eggs I followed this pattern here.

Thursday, 13 March 2014

Spring activities

Last weekend we went out flying. Yes, flying with a quadcopter, a model aircraft Peter bought for work. The quadcopter is equipped with a camera and is going to be employed to fly over fields to give an overview of crops. First we spent the morning at home searching the net for instructions, and thanks to Youtube we found really good videos how to get the software working and the aircraft started. Then we drove outside town to a field far away from buildings.
Our first flight was a bit of an adventure as you cannot see the little white quadcopter well against the bright sky when reaching 50 meters of hight. I'm also not used to estimate distances of flying objects, our little fellow always seemed to be too far away from us. The camera which is mounted underneath the body of the quadcopter was connected to our tablet. We could see the hight, distance and battery status and of course the field it was flying over. We trained starts and (soft) landings and how to use all the control instruments. It was such fun, and I'm sure the people who are going to work with the quadcopter will love it too.
Coming back home I admired our spring basket with the pink hyacinth. It grew every day a few centimeters and got heavier too with all flowers opening almost at once. I tied it to the basket handle as the flowers touched the wall already.
My mixed stripy blanket is growing too. I tried to balance the colours as I found the combinations so far a bit too much. Via ravelry I found out about random stripes and colour generators like this one here and even one for squares here. Amazing what is out there in the net! I have not used the generators though, but bookmarked them for future use.
I visited a tea house the other day with my lovely friend U. It is a small shop where they sell tea and cakes. In a little room at the back of the shop you can also drink tea and eat yummy curries. It's been a long time since I sat in a tea house (in Frankfurt there used to be one a few years ago). In our region I didn't know any, and I was very surprised and pleased to find out about that place. Have to go there more often!

Monday, 3 March 2014

Mixed pattern, stripy blanket

I started to crochet a new blanket a few weeks ago. My second blanket in fact. It's a fun project to play with lots of colour combinations and to learn new patterns! Actually I first planned to follow just one blanket crochet along. Then I figured it would be a good opportunity to try out more patterns. The blanket is going to be large enough to have a variety of patterns. And the list of websites I'm gathering patterns from is growing:

1. Hannah's from "Not your average crochet" (Pdf-document, easy to follow!)
2. Jules' from "Little woolie" and
3. Carina's + Jessica's from "Schoenstricken.de" (Very instructional pictures, written in German)
4. Ana Contreras' from "Lanas de Ana"
5. I'm going to try some hearts-in-a-row from here "Annie's crochet world"

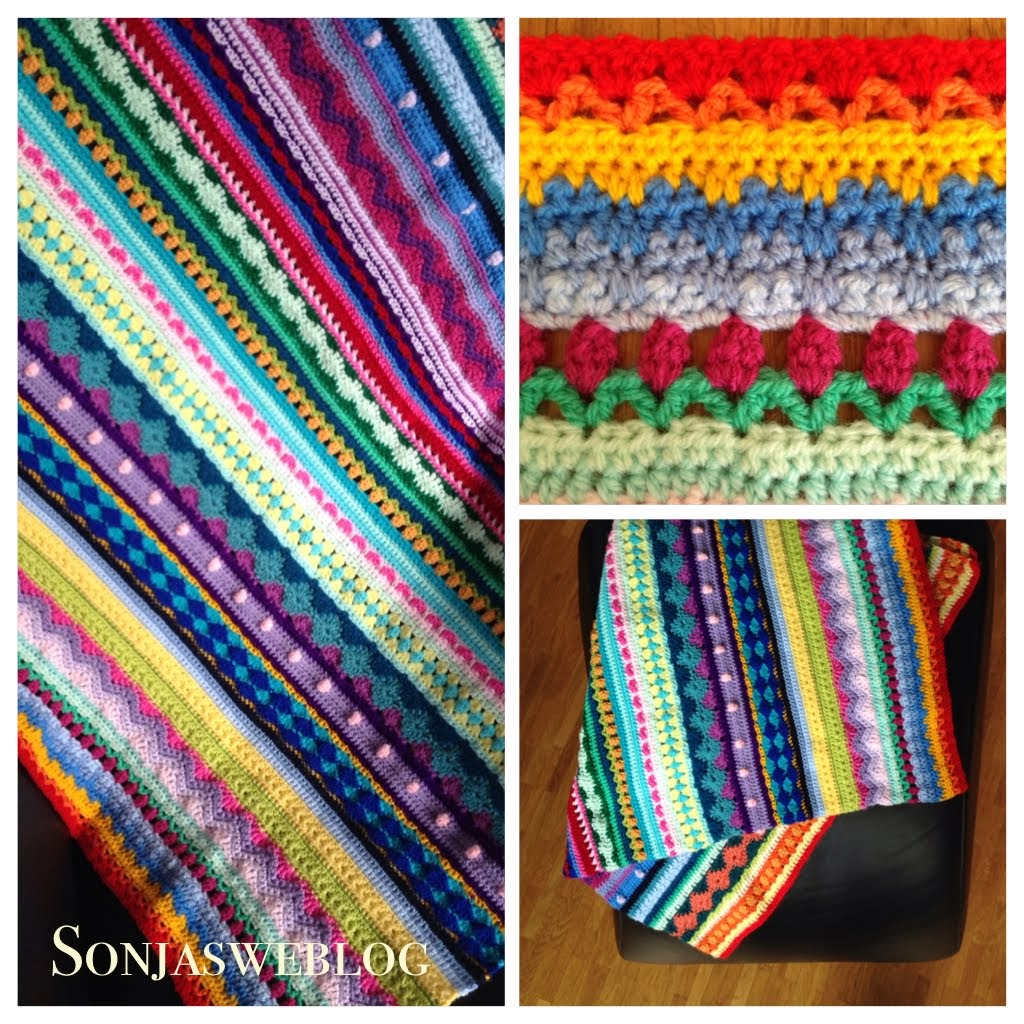
Here is the beginning, the first 18 rows: Besides single crochet, half double crochet and double crochet, I used the Granny Stripe, Catherine Wheel and Star Stitch.
 
Followed by Bobbles and Chevron-Ripples:

Then Waves and Tulips:

Here are outlined clusters (actually trying to make it look like hearts, but I will try another pattern for that), Granny Stripes and Catherine Wheel again.

Followed by another row of Bobbles, Shell Stitch and Star Stitch:

This is what it looks like so far:
Yes, very colourful, very stripy, jumping right into your eyes! When planning this blanket it was cold and grey outside and I felt a need for cheery colours. Hope I will like them in summer as well.

Saturday, 22 February 2014

Making scratchy yarn soft

Last year I crocheted the Japanese flower scarf inspired by Lucy's blogpost. I ordered my first ever Japanese crochet book from Japan in Japanese and surprised myself in being able to follow the stitch pattern. It was quick and easy going and such a joy. I used the beautiful yarn Lucy recommended: Debbie Bliss Andes, which consists of 65% baby Alpaca and 35% mulberry silk. Very soft and fluffy yarn. What I least expected of this yarn was that it was scratchy to my skin. What a disappointment! Still I loved the scarf very much and only used it when wearing a polo-neck jumper. Then I came across Kat's blogpost about how to make yarn less scratchy. It sounded quite simple and worth a try. You just need a teaspoon of lanolin, a teaspoon of dish detergent and some hot water. Stir lanolin with dish detergent in a container with hot water until lanolin has dissolved, let the soapy water cool down a bit and add your wooly item. Fill in some more water until wooly item is covered and let soak for a few hours. I let my scarf soak for six hours and rolled it into a big towl to drain. (No rinse with clear water) Then I let the scarf dry flatly on a towel.
And miraculously the scarf was less scratchy afterwards! In the tutorial it is recommended to repeat this treatment until the wooly item is soft enough. Well, for me it was already an improvement even though it is still a tiny bit scratchy.

Thursday, 13 February 2014

Two little owls and the beginning of a new blanket

The companion for the first owl is finished! I blogged about the first one here. Now there are two happy fellows who already found a new home. A friend of mine who came over to our place loved them so much I gave them to her.
So there is room for more amigurumi projects :-)
 
But first I am working on a new blanket project. It is a mixed pattern, stripy blanket. There are great tutorials out in the net and I am following the ones from the talented crocheters HannahJules and Carina and Jessica. And my first few rows are looking like this:
I am using my stash of Schachenmayr Original Bravo that I blogged about earlier. I love working with this acrylic yarn as it is easy to crochet with, stitches are clearly defined, it is soft and machine washable. I chained 241 stitches using a 4 mm hook and doing the rows back and forth. Having so many colours to choose from I hope they will go together nicely.

Wednesday, 22 January 2014

Little owl

After crocheting one lovely hexagon after another for the last couple of weeks, trying out lots of new patterns and playing with colour combinations, I tried another amigurumi pattern once again.
But firstly here are the new hexagons I did for Natasja's crochet for kidneys project I blogged about earlier.
As it is time to send them in, I started to follow a pattern of the talented Becky for a little owl. Actually I thought the owl would be much much smaller. But for this I have to use a very small hook size and much lighter yarn. Still the size is ok for decoration. The little fellow below just measures 6 cm in height. I filled half the body with rice to give it better stability. The other half is filled with stuffing material.
 
Now I am crocheting another owl for the first one to have a companion :-)

Wednesday, 8 January 2014

Crochet for kidneys

First things first: Happy New Year! Have a great, creative and joyful 2014!
We had a very relaxed turn of the year, having a simple but yummy dinner with smoked salmon, potato pancake and salad. We spent the evening on the sofa watching TV, and at midnight we were gazing at the many fireworks around our place.
So now one week into the new year daily routine is back. Except for crochet projects. Last year I wrote about my new stash of yarn. So what to do with all the new yarn? Actually I planned to crochet another blanket for a long time already. And then I read about Natasja's crochet for kidneys project - and I knew exactely what to start to do with it!!!

 
And I love to crochet hexagons. So this is what I did the last couple of weeks:
 

I used the hexagon pattern compilation from moogly and Natasja's hexagon in bloom pattern. It is so much fun playing with the various colours and pattern. If you would have visited me on a weekend evening you would have seen me on the sofa covered with lots of yarn balls, scissors and a measuring tape and a heap of crocheted hexagons. What a joy! :-)))


Sunday, 29 December 2013

New stash of yarn

My Christmas present for myself is a new stash of yarn from Schachenmayr original called "Bravo". It's an acrylic fiber which comes in a broad range of colours. Since I couldn't decide which of the many shades of each colour I should choose, I bought 36 balls of yarn each in a different shade. Some of them differ just slightly from each other and you can see the difference in sun light only. However, I was very pleased with my choice. I never had such a broad range of colours to choose from. And the yarn is easy to crochet with. So lots of holiday crochet fun for me!

Thursday, 19 December 2013

Lacy Stars

Looking for something quick to crochet as Christmas decoration? The very talented Lucy from Attic24 has written a pattern for little lacy stars. The pattern is easy to follow and has lots of helpful pictures. I hooked up a couple of them to use als decoration for gifts. They were fun to make and very easy.

Sunday, 24 November 2013

Minion completed!

Another amigurumi finished! :-) This minion project consisted of  many details, tiny little things to crochet and to sew together, for example the fingers/ gloves. Did you know the minions only have three fingers? I wouldn't know if Stephanie from All about ami didn't write about it . I followed her pattern for the minion and got some inspiration for the face from Stephanie's crochet corner, a post with pictures of other crocheted minions.
Until I cut out the eyes from felt and stitched on the mouth it looked more like a giant medicine capsule. But a "face" changed it all! I used quite a bit of glue to attatch the eyes, the gloves and the pockets of the overall. With yellow yarn I did a little embroidery on the overall and it's pockets.
Then I put everything together. Contrary to the pattern I didn't used upper and lower eyelids. I crocheted them and tried to fix them onto the face. But I liked the look without eyelids much better. So this minion has none. The trademark goggles though are indispensable!
My sister wanted the minion to hold a heart just like in the picture from the crochet corner. So I crocheted a little heart too and fixed it onto the glove.
So there he is: minion with heart :-)
He is about 23 cm tall and needs something to rest his back in order to stand on his little feet. I should have used some rice to stuff the shoes instead of cotton only. But still, I love the minion very much.
Cute little amigurumi, looking forward to see the second part of your movie soon!

Wednesday, 23 October 2013

Minion - WIP

What happened to the minion, my new amigurumi crochet work in progress, I started two weeks ago? I finished the body part, stuffed it and added some hair. In order to keep the black strands of yarn from unravelling I used some glue and trimmed it. Then I started the overall which consists of little pieces of crocheted details. The main part of the overall though is crocheted like the body part, in rounds. Now I have to assemble the overall parts and continue with the arms, shoes and face.
The pattern for this amigurumi can be found on "All about Ami"

Saturday, 12 October 2013

Minion - Work in progress

Have you seen the movie "Despicable me"? A computer-animated comedy film about a super villain who adopts three little girls who bring out the good side of him. I didn't know it until I visited my sister who watched the DVD with me. Actually the title and movie poster did not appeal to me at all. But the side characters, the minions, are very funny and adorable. And after watching the whole movie and all the extra features on the DVD I started to like them too. There are more mini film clips of the minions on YouTube and next year there will be a whole movie featuring the minions.
My sister and I then searched the web and found a pattern for a crocheted minion. Hurrah! Stephanie from "All about ami", the very talented amigurumi and crochet artist, wrote a pattern for a minion. As my sister loved it very much I promised to crochet one for her. So this is the start of a new amigurumi project.
I bought some yellow, blue, black and grey yarn and started to crochet the body. I just did on third of it and I am curious how it will turn out. What you see in the picture below is the upper part of the head

Thursday, 10 October 2013

Happy flower decoration

We had a real autumn weekend with lots of wind and tons of leaves blown off the trees. I felt like making something flowery, something to remind me of summer. So I looked up my crochet project database in ravelry and came across the happy flower decoration by the very talented Lucy of Attic24. She wrote a very detailled pattern description with lots of helpful pictures.
And it was really joyful to work on this flower: lots of different colours, quick and easy to make.
To finish off and give more stability to the flower, I used some glue as recommended in the pattern description. First I was a bit skeptical about the glue, which has a white colour when applying, that it would not turn out transparent. But all turned out well, the front is nice and wooly and the back is stiff with invisible glue. Then I assembled the three crocheted pieces and added some beads too. What fun! It has been ages since I last worked with beads.
This happy flower makes me smile!

Tuesday, 8 October 2013

iCat phone cozy

Do you sometimes have yarn you like but don't know what to make of it? I got this beige/ brownish yarn from somewhere and only two skeins of it. So not enough for a shawl and a hat. Maybe for another Amineko? Yes, that would do! But I felt like crocheting something else for a change and I stumbled across Jessica's blog introducing the iCat phone cozy. The original website is here.
No text, just pictures. So I tried as good as I could and it turned out like this:
I took the measurements from my phone. The body is done quick and easy crocheting in rounds until the desired height is reached. For the ears I did half trebles and trebles. The legs were a bit tricky. I just crocheted a square (first two rows with white yarn) and then sew it onto the body. In the middle of the square I stitched a vertical line to separate the "legs". The eyes are just a crocheted oval tied in the middle with a piece of yarn, then sewn onto the body.
The tail is also a square (first 3 rows with white yarn), then sewn onto the backsite of the body. Then I stitched the face and the "iCat" lettering which was the most complicated part for me. I tried a couple of times, undid it and stitched again. I am not too happy about the lettering but it will do for the moment.  Finally I crocheted the supporting loop with pink and white yarn and secured it onto the upper right side of the phone cozy. Finished :-)
 

Sunday, 6 October 2013

More Aminekos

I love to crochet amigurumis, especially aminekos (I wrote about them already here.) They are fun to crochet. The sizes range from 21 cm to 28 cm, depending on your hook size and yarn weight, so it just takes a few days to make them. I crocheted more of them until I got a whole gang of cats:

In fact, they take the place of one of our shelfs already. And Peter is starting to be afraid of me producing a plethora of crocheted cats which will slowly but steadily congest our whole book shelf.

No worries though, all of them will just stay temporarily with us, with the exception of the beige amineko, a gift from my sister which I will keep. The others will go to different homes of friends of mine to spread the amineko love.

Wednesday, 28 August 2013

Japanese flower scarf

Flowers in winter, around my neck. That was my motivation for the Japanese flower scarf. I first discovered this scarf pattern here and was immediately spellbound. Since the pattern was not in the Internet I bought the pattern book from Japan via Etsy. It arrived only one week later, very carefully packed. I was a bit afraid at the beginning if I would be able to read the crochet stitch diagram as everything in that book was written in Japanese. But what a joy, it worked out just right, the stitch diagram was enlarged and very clear with international symbols! I have never before worked with stitch diagrams and with the help of translation tables it was easy to crochet along.
As for the yarn I was intrigued by Lucy's description of Debbie Bliss Andes. I searched the net and found Debbie Bliss Andes at eBay. This yarn is really rather luxurious and soooo soft. It was great joy to crochet the Japanese flower scarf, everything so exotic for me from pattern to yarn. And I was almost a bit sad to have finished this scarf.

Thursday, 22 August 2013

Phone cozy

The starling handbag needed a partner, a phone cozy to go along with it. The pattern consists of single crochets and the button is a crocheted ball. It fits the black bag as well, but maybe I'm going to do a black one too.


Wednesday, 21 August 2013

Starling Handbag

You can never have too many bags! This is what I thought when I first saw Futuregirl's starling handbag. The very talented Alice from Futuregirl did not only write a tutorial which is available in four languages (English, French, German, Italian), she also did video tutorials (very helpful) and a tutorial for sewing a lining into the bag!!! 
I crocheted the bag with soft cotton yarn (Lana Grossa Linea Pura) and thanks to the video tutorials I learned some new techniques. The lining part was not easy for me, as I don't have a sewing machine and generally don't like sewing much. So it took me quite a while to finish the whole bag. But the lining improved the quality of the bag, as the cotton yarn is so soft the bag can't keep its shape by itself. I also added a magnetic button.
Well, before I did the lining part I crocheted a second starling bag with black yarn (Lana Grossa Secondo). This yarn is a bit thinner so the bag is a bit smaller than the beige one, but stability is much better. So the black bag will be used without lining!
 If you are looking for ideas to crochet a bag have a look at this website and here. Jessica from Schoenstricken collected lots of fabulous ideas within blogland. Have fun!